Multicolor molas are usually depict pictorial images. Multicolor molas tell stories from Kuna mythology, everyday life, historical events, might depict personalities, like famous athletes, political events, even popular advertisements.

The following tutorial is based on a beautiful multicolor mola from the British museum collection (original link). It is a cotton mola featuring 'sappur sikwi' (bird in jungle) surrounded by leaves; Moreover, the design combines 'tas tas' (slit shaped) and 'mare mare' (circular) fillers. At the top edge it has a line of ric rac.
 |
| © The Trustees of the British Museum |

Step 2: Lay the fabrics one above the other with their edges aligned.

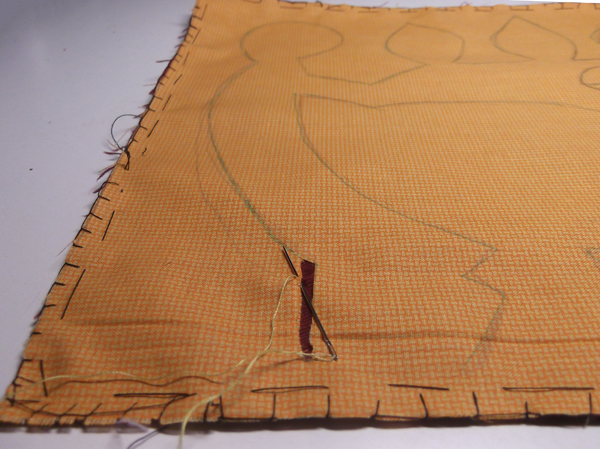
Step 3: Baste the fabrics together with a tacking stitch. You can also make a blanket stitch around the edges to prevent further fraying.

Phase 1: Creating the basic channel.
The first step in creating a multicolor mola is to create the basic channel. Then you can start adding applique or reverse applique detail. The channel is often used to define the outline of a figure, like a bird, a turtle, an objects or a man. The channel is the base of the multicolor mola and you have already learned to create channels in previous tutorials.
Step 4: With a pencil draw directly on the top fabric the shape of a bird and the surrounding line.

Step 5: With scissors pierce the top fabric at any point on the design line. The difference between two/three color mola and multicolor mola is that you must cut the design line, not the fold line. Cut a few inches on the line.

Step 7: Continue, cutting, folding and stitching the outer edge.

Step 8: Before you complete the outer edge you can start folding under and stitching the inner edge, otherwise a large part of the top fabric will be detached. Alternatively, you can pin or baste with tacking line the inner shape.

Step 9: After finishing both the inner and outer edge you'll have a dark red contour around the bird. Follow the same steps to stitch the outline of the bird.You have created the framework (or skeleton) of the multicolor mola.

Phase 2: Add applique detail
Step 10: Cut another piece of fabric of different color and place it above the bird. Cover completely the bird.
Step 11: Pin the new piece of fabric to the other two.

Step 12: Turn the work over. Tack the three pieces of cloth together, along the inner outline of the bird. Do a tack stitch along the inner outline of the bird.
 |
| The reverse side of the work |
Step 13: Turn again the fabrics, right side up. The shape of the bird has clearly appeared on top.

Step 14: With scissors cut the fabric around the tacking stitches, leaving a small allowance.

Step 15: Now with scissors cut the fabric on the tacking stitch. Work as usual, snip some tacking stitches, fold the edge of the purple fabric under and stitch through all fabrics with hem stitch. Turn the edge under so that it is no more than 1/8 inch from the edge.


Step 16: Work all around the body of the bird.

Step 17: Add more layers of fabric (applique detail). Place for example, a rectangular piece covering part of the bird. Pin the fabric together.

Step 18: Turn the mola upside down. With tacking stitches draw the outline of the shape.


Step 20: Cut the fabric around and on the tacking stitch.

Step 21: Work as usual, snip some tacking stitches, fold the edge of the green fabric under and stitch through all fabrics with hem stitch. Turn the edge under so that it is no more than 1/8 inch from the edge.

Step 22: Add another layer and take the design lines from the back of the mola.

Step 23: Applique only the top edge of the white fabric. With scissors make some deep parallel cuttings on the bottom edge. Try to keep even width space between the cuttings.

Step 24: Hem stitch the white fabric in place, shaping the feathers.


Step 25: Cut and position more of the details in the same way. Place another layer over the feathers. As you have already understood, most of the appliqued details have outlines around them. These are made by first appliqueing a shape and then appliqueing another shape over it, leaving the lower one revealed as an outline around the shape. However not all appliqued details have outlines. If they are too narrow it is not necessary to have outlines.


Step 27: Lay another fabric patch on top of the previous patches.

Step 28: Cut the fabric around the tacking stitches, turn the edge under and stitch down in place.

Step 29: One way to fill in empty space is by creating small dots with reverse applique. With scissors pierce the top, purple fabric, cut a small cross and hem stitch creating tiny dots.

Step 30: Repeat the process and add details on the other circle.

Step 31: Add more applique details. Cut and stitch a matching shape inside the first leaf.

Step 32: Over the white layer cut and position two half patches of different color.

Step 33: Add a third applique layer.

Phase 3: The Vertical Slits
Step 34: Vertical slits fill the empty spaces and add color and vividness to a mola. Slits are created with the inlay applique technique. With the scissors cut the top layer making a long slit. Also cut a narrow fabric patch.
Step 35: Take the patch and insert it, through the slit between the two layers. Use the small scissors to put the piece in place.


Step 36: Hem stitch the top layer to the patch and the foundation layer.


Step 37: Fill all the empty surfaces with colourful slits. Remember, that multicolor molas was a great opportunity for the Kuna women to re-use fabric leftovers.

Step 38: Add more applique and embroidery detail (the eye, the legs, the leaves).
Note: The process does not always have to follow the above mentioned order. The mola maker might around, adding slits before completing all the applique details.


What a great explanation of the art of mola making. Now I want to have a go. Thank you.
ReplyDeleteMany, many thanks. I hope I find time to make relative videos
DeleteHello, I found your mola tutorials when I was making my first mola work! Thank you for the great tips. I hope you don't mind that I linked your tutorial to my blogpost for my sewing friends. It's in finnish but you can take a look at my work if you like here: http://helmojajahepeneita.blogspot.fi/2017/02/koiravauvakuulumisia-ja-kirjottu.html
ReplyDeleteThank you for sharing your work. It is beautiful
DeleteIt is amazing work it is looks like teentmakers in my country Egypt...
ReplyDeleteThank you for this tutorial. It is very much appreciated! I came across molas in a small shop while visiting Cartagena, Columbia last month and was immediately drawn to them. I had no idea what they were but I was so drawn in by the beautiful designs and the fact that they were hand-stitched by women. I bought ten of them! I feel as if I have stumbled onto a true treasure, and I'm enjoying learning as much about them as I can. Thanks, again!
ReplyDeleteVisiting SanBlas,Panama I was taken with the Kunas and the women's MOLAS. I have an inventory collection of over 150 and have 35 framed MOLAS hanging in my home. Contact me at dgrab736@gmail.com to view and purchase.
ReplyDelete