Follow the step by step instructions or see the video. You'll stitch the leaf with long and short stitches using three shades of green. At the central vein the contrast between light and dark shades gives more depth to the leaf.

Stitches
Threads
You need two or three shades of green. In this project I used Anchor cotton threads (numbers 268, 267, 265)
Step by step instructions
1. Draw with a pencil the shape of a simple petal. Draw also the central vein and some guidelines from the outer outline towards the center.

2. Outline the edges of the leaf and the central vein with split stitch. Use 2 strands of the lightest shade. The split stitch will form the foundation for the short and long stitches.

3. The leaf will be filled with long and short stitches. Start with the darkest (or lightest) shade of thread. Use 3-strand thread. Start from the outside top edge and from the center tip of the leaf and work towards the central vein and towards one side. Bring the needle up through point (1) and down over the split stitch line through point (2). Pass the threads over the split stitch ensuring a neat edge.
4. Bring the needle to the front through point (3) and to the back through point (4) passing over the split stitch line.

5. Subtly alter the direction of stitches to follow the curve and to adapt to the shape of the leaf. Do not make all the stitches the same length. Vary the length to achieve a more natural look.

6. After completing the one side, stitch the other starting from the center towards the side.

7. Take the next lightest shade of 3-strand thread and work the second row. From now on you will stitch only long stitches. Again start from the center outwards to the sides. Bring the needle from back to front through point (a) splitting the edges of the previous stitches. The splitting makes colors mixing together. Bring the needle back through point (b) splitting the split stitch line.

8. Continue in this way working only with long stitches. First stitch the one side and then the other. In case the stitches reach the central vein then split it in half.

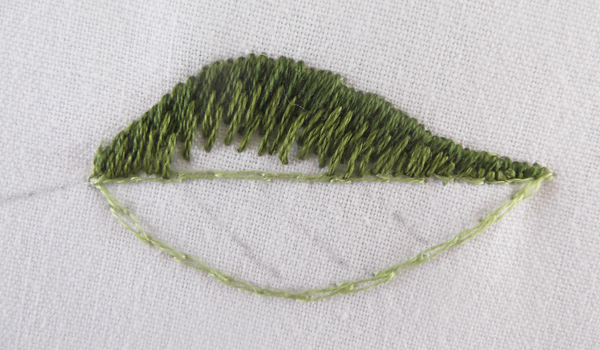
9. Take the lightest shade of 3-strand thread and stitch the final row. Remember to split the previous stitches and the central vein.

11. Now you' ll stitch the first row of the other part of the leaf with long & short stitches. Pick the lightest shade of 3-strand thread. Start from the outside bottom edge, from the center tip of the leaf and work towards the centre vein and towards one side. Pass the threads over the split stitch to ensure a neat edge.

12. Take the next darkest shade of 3-strand thread and work the second row. Stitch only long stitches and adjust the length to achieve a more natural effect.

13. Finally add the darkest shade. Having the contrasting shades meeting at the center makes the leaf more vivid and three dimensional. Moreover, to add more detail and depth work over stitching with 1-strand of the lightest colour.

14. Take 2-strands of the lightest shade and split stitch the vein.

Threads
You need two or three shades of green. In this project I used Anchor cotton threads (numbers 268, 267, 265)
Step by step instructions
1. Draw with a pencil the shape of a simple petal. Draw also the central vein and some guidelines from the outer outline towards the center.
3. The leaf will be filled with long and short stitches. Start with the darkest (or lightest) shade of thread. Use 3-strand thread. Start from the outside top edge and from the center tip of the leaf and work towards the central vein and towards one side. Bring the needle up through point (1) and down over the split stitch line through point (2). Pass the threads over the split stitch ensuring a neat edge.
4. Bring the needle to the front through point (3) and to the back through point (4) passing over the split stitch line.
5. Subtly alter the direction of stitches to follow the curve and to adapt to the shape of the leaf. Do not make all the stitches the same length. Vary the length to achieve a more natural look.
8. Continue in this way working only with long stitches. First stitch the one side and then the other. In case the stitches reach the central vein then split it in half.
11. Now you' ll stitch the first row of the other part of the leaf with long & short stitches. Pick the lightest shade of 3-strand thread. Start from the outside bottom edge, from the center tip of the leaf and work towards the centre vein and towards one side. Pass the threads over the split stitch to ensure a neat edge.
12. Take the next darkest shade of 3-strand thread and work the second row. Stitch only long stitches and adjust the length to achieve a more natural effect.
13. Finally add the darkest shade. Having the contrasting shades meeting at the center makes the leaf more vivid and three dimensional. Moreover, to add more detail and depth work over stitching with 1-strand of the lightest colour.


No comments:
Post a Comment