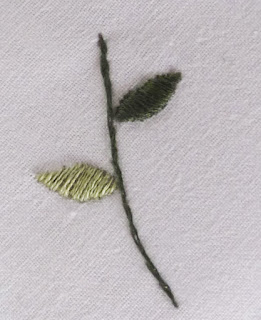
Flowers and leaves are probably the most popular motif in surface hand embroidery. In this tutorial you 'll learn how to stitch tiny leaves with slanted satin stitch.
Stitches
Step by step instructions
1. Use pencil or carbon paper to draw or transfer the motif on the fabric. Use two strands of thread to outline the leaf shape with split stitch.

2. Pad the shape. Use two strands of thread and fill the shape with satin stitch. Start from the center outwards. Make the stitches diagonal in the opposite direction to the final layer. Stitch inside the split stitch outline.

3. Use 1 or 2 strands of thread and satin stitch a second layer working on the opposite diagonal. Stitch outside the split stitch outline.


Stitches
Step by step instructions
1. Use pencil or carbon paper to draw or transfer the motif on the fabric. Use two strands of thread to outline the leaf shape with split stitch.
2. Pad the shape. Use two strands of thread and fill the shape with satin stitch. Start from the center outwards. Make the stitches diagonal in the opposite direction to the final layer. Stitch inside the split stitch outline.

3. Use 1 or 2 strands of thread and satin stitch a second layer working on the opposite diagonal. Stitch outside the split stitch outline.


Lovely post! This embroidery is art. It remembers me about my grandmother.I must learn and make some flowers myself.
ReplyDelete