Showing posts with label Tutorials. Show all posts
Showing posts with label Tutorials. Show all posts
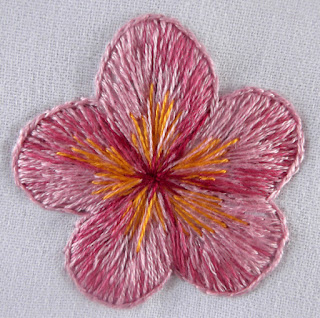
Tutorial 04: Flower with petals
The process is similar to petal stitching with long and short stitches. However, in this tutorial you are going to learn and practice two more popular techniques in thread painting:
a) Mixing threads of different colors.
b) Adding darker or lighter shades and details with 1-strand thread.
a) Mixing threads of different colors.
b) Adding darker or lighter shades and details with 1-strand thread.
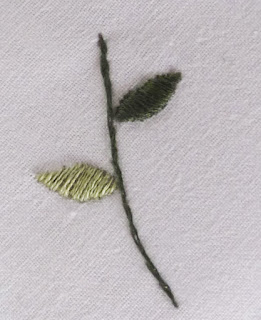
Tutorial 03: How to satin stitch small leaves
Flowers and leaves are probably the most popular motif in surface hand embroidery. In this tutorial you 'll learn how to stitch tiny leaves with slanted satin stitch.
Stitches
Stitches
Tutorial 02: Flower Embroidery/ Thread Painting/ Silk shading a leaf
Follow the step by step instructions or see the video. You'll stitch the leaf with long and short stitches using three shades of green. At the central vein the contrast between light and dark shades gives more depth to the leaf.
Tutorial 01: Flower Embroidery/ Thread Painting/ Silk shading a flower petal (Photos & Video)
You can either follow the step by step instructions with photos or see the video. Petals and flower are most typically stitched with long & short satin stitches.
Threads
- Anchor 144 (light blue)
- Anchor 145 (light blue)
- Anchor 146 (light blue)
- Anchor 410 (vivid blue)
The difference between even-weave and plainweave fabrics
The difference between several fabrics that are used in embroidery relates to how each type is woven and how those fibers are spaced.
In general, a typical fabric is woven on a loom, where the horizontal threads (weft threads) are woven across the vertical threads (warp threads), in an over and under
fashion. If fabric contains the same number of warp and weft threads per inch then it is called even-weave. Canvas is a type of even-weave fabric whose holes are larger that the threads that separate them. If fabric does not contain the same number of warp and weft threads is called plainweave.
The difference between free embroidery, needlepoint and cross stitch
The word embroidery is used to describe any kind of decorative needlework on fabric, that involves threads and needle. The term encompasses many different types of needlework like applique, cut-work, free stitching, cross-stitch etc.
The term free embroidery (or free-hand embroidery) describes the style of needlework that involves applying several decorative stitches to fabric without using the fabric's weave as a guide. The typical process is the following: At first, the stitcher draws the pattern on the fabric using pencil, carbon paper, erasable marker etc and then he/she stitches the pattern with threads and needle. The length of each stitch might be slightly different since the stitcher relies on his/her experienced eye. Suitable fabrics for free-hand embroidery are cotton, linen, silk and others.
The term free embroidery (or free-hand embroidery) describes the style of needlework that involves applying several decorative stitches to fabric without using the fabric's weave as a guide. The typical process is the following: At first, the stitcher draws the pattern on the fabric using pencil, carbon paper, erasable marker etc and then he/she stitches the pattern with threads and needle. The length of each stitch might be slightly different since the stitcher relies on his/her experienced eye. Suitable fabrics for free-hand embroidery are cotton, linen, silk and others.
| Free embroidery or plain embroidery |
Mola tutorial 07: A multicolor bird in jungle (sappur sikwi)
Multicolor molas are usually depict pictorial images. Multicolor molas tell stories from Kuna mythology, everyday life, historical events, might depict personalities, like famous athletes, political events, even popular advertisements.
The following tutorial is based on a beautiful multicolor mola from the British museum collection (original link). It is a cotton mola featuring 'sappur sikwi' (bird in jungle) surrounded by leaves; Moreover, the design combines 'tas tas' (slit shaped) and 'mare mare' (circular) fillers. At the top edge it has a line of ric rac.
Mola tutorial 06: A three-layer Mola: The reverse applique technique
Three
color molas are made with three complete layers of fabric. Kuna women drew the design with a pencil directly onto the fabric. The more experienced one, could even start a mola without the need to sketch the design with a pencil. They simply
started stitching and cutting the fabric.
Mola tutorial 02- A two layer mola
Two-layer geometric molas are the oldest type of mola art. The technique is similar to reverse applique stitching. Lets start with an easy pattern, the meander or labyrinth, a popular pattern in Kuna culture. Two color molas are made with two layers of fabric basted together. The top layer is cut and stitched a little at a time, revealing gradually channels of the foundation layer. The width of the channel is normally about 1/4 inch.
Mola tutorial 01- Materials & tools
To start making molas you need easy to find materials, like pieces of fabric, scissors, thread and a needle.
Fabric
Fabric
The best fabric to use for making molas is 100%, lightweight cotton. If you can't fιnd 100% cotton you can use blended fabric of cotton and polyester. Authentic molas use solid colors. However, occasionally, you might see printed fabrics, since it was not always easy to find solid colors. In the molas, it is used lightweight fabric. However the Kunas sometimes use also heavy type of cotton, but only for the foundation layer.
Types of needles
Different types of stitching require different types of needles. These are the most common types.
- Tapestry needles: These needles are characterized by large eyes and blunt ends and they are suitable for needlepoint, cross stitch and drawn thread work. The large eye let them carry a heavier weight yarn, such as wool yarn. The blunt tip allows them to pass through the loosely woven canvas without catching or tearing the threads. So, this type of needle is suitable for those types of needlework in which the point of the needle is not meant to pierce the fabric. Sizes ranges from 28 (the smallest) to 13 (largest).
How to clean your needlework
How to wash your needlework by hand.
1. In a bowl, mix a mild detergent with enough room- temperature water. Dissolve the detergent.
2. Submerge your piece in the water.
3. If the piece is filthy enough, soak it for a half hour or so. Otherwise a few minutes will do. If there is a stubborn stain use a soft brush or a sponge to gently scrub the spot.
4. Rinse the piece, by placing it under cold water.
5. Do not wring out your piece. To remove excess water roll the fabric up in a clean towel and gently squeeze out the excess water.
6. Unroll the towel and lay your piece on it.
7. Allow it to air dry.
If you fail to clean a stubborn stain, then you can take your piece to a dry cleaner- preferably one that has experience cleaning such items.
How to iron your needlework.
1. Place a clean white towel on your ironing board.
2. Lay your piece face down on the towel.
3. With a dry iron on a medium setting iron the piece.
Note: For better result you can start ironing when the piece is a bit damp.
Selecting needle for needlepoint
Needlepoint is worked with tapestry needles. Tapestry needles differ from most other types of needle in that they have a blunt tip rather than a pointed one and a large, elongated eye. The blunt tip is essential so that the needle slides smoothly through the canvas holes without splitting the wool or catching the canvas threads whilst stitching. The large eye is necessary, in order the needle to accomodate thick or multiple strands of floss or wool.

Tapestry needles are sized by number and the bigger the number the finer the needle. The range of sizes goes from 13 (the largest) to 28. The correct size of the needle depends on the canvas gauge and yarn thickness. A small needle should be used on fine-mesh canvases while a thicker needle is used on larger canvas sizes. Accordingly, if a too small needle is used then the wool will probably twist, fray and wear thin, while if a larger needle is used then the needle will probably enlarges and distorts the holes of the canvas.
Needlepoint canvas types
Needlepoint canvas is a mesh of horizontal (warp) and vertical (weft) threads. There are several types of needlepoint canvases and the most basic feature that distinguishes one type from another is the manner in which the canvas is woven.
The three most commonly used needlepoint canvas types are the following:
Subscribe to:
Posts (Atom)


