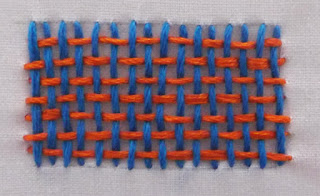
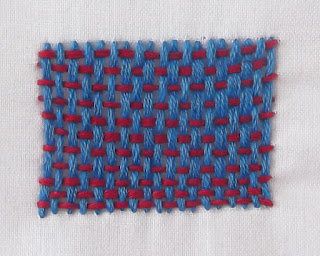
The woven filling stitch is a simple, easy to use technique, suitable for filling areas with a basket-weave texture. You can use one of two colors (either of similar or contrasting shades). The stitch is worked in two stages. At the first stage, the stitcher lays the vertical threads (warp threads), while at the second the stitcher weaves the horizontal threads between the vertical threads (in an over-under fashion).
Instructions
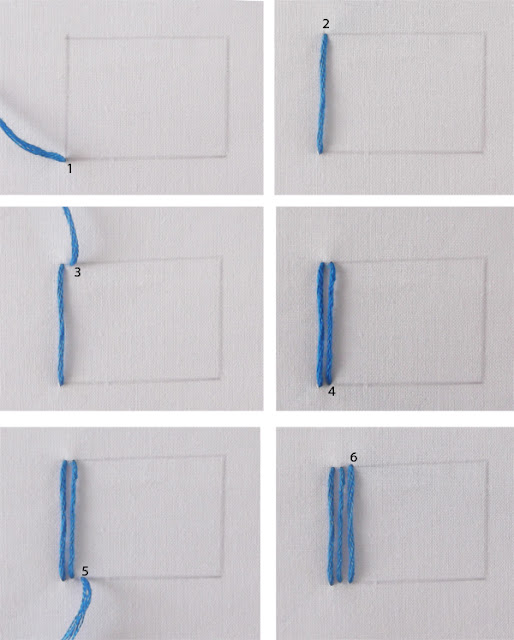
1. First you have to lay the vertical threads (warp threads). These threads will make the foundation for the woven filling. Draw a shape with a pencil or transfer it with a carbon paper. Start your thread in any corner of the shape passing the needle from back to front through point (1).
2. Run your thread to the opposite edge and pass you needle from front to back through point (2).
3. Bring the needle to the right of the previous point. In this way you save thread and avoid building up long stitches on the underside of the fabric. Pass the needle from back to front through point (3). You have to leave some space between point (2) and (3).
4. Run the needle downward, parallel to the first stitch, to the opposite edge of the shape. Pass the needle from front to back through point (4).
5. Bring the needle to the right of the previous point and pass it from back to front through point (5).
6. Pass the needle back through point (6).
Continue in this manner until the shape is fully covered with long, vertical stitches.
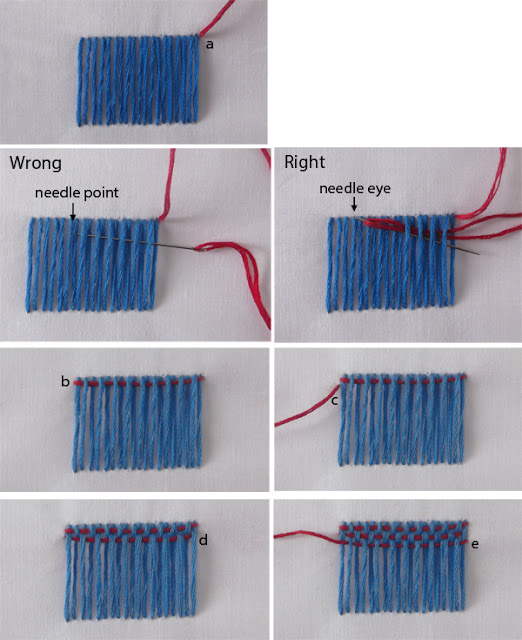
7. Start a new thread of the same or different color. Pass the needle from back to front through point (a). You can start from any of the corners.
8. Since the warp threads are vertical, you will work horizontally. Weave through the warp threads in an over-under fashion. To make the weaving easier you should work either with a blunt needle or you can turn the needle upside down and work with the eye of the needle.
9. When you reach the other side of the shape, pass the needle back through the fabric from front to back through point (b).
10. Bring the needle from back to front right next to the previous point, though point (c).
11. Weave back across the warp threads in an over-under fashion until you reach the other side of the shape. Pass the needle from front to back through point (d).
12. Bring the needle from back to front through point (e) and weave.
Note that between the rows you must alternate the “unders” and “overs” to achieve a brick style.
Repeat as many times as necessary to fill the shape.
If you want a more open filling, you can keep larger distances between warp threads and between weft threads. If you want a more solid filling you can make stitches very close to each other. The density of the filling depends also upon the thread thickness.
In woven filling technique, you can use any type of thread, such as silk, cotton, knitting yarn and much more. You can even mix thread types. By use a different thread type between vertical and horizontal threads you can add depth to the surface and make it more textured.
Woven filling stitch is worked either vertically, horizontally or slanted. To keep equal distances between warp threads and weft threads you can mark the fabric or do it by eye.
In relation to colors, you can use:
a) Two contrasting colors for a more colorful effect,
b) The same color for a solid filling.
c) Two close shades to achieve a more vibrant effect.


No comments:
Post a Comment